This tutorial is for intermediate developers that are looking for a practical example on how to build a custom Gutenberg block using ACF Pro.
Prerequisite: You should have at least skimmed the official documentation on ACF Blocks.
Elliot Condon, the genius behind ACF shows how a slider block can be built in 30 min here. This article (written version) extends on the above with these main differences:
- Flickity instead of Slick
- a custom functionality plugin instead of a theme
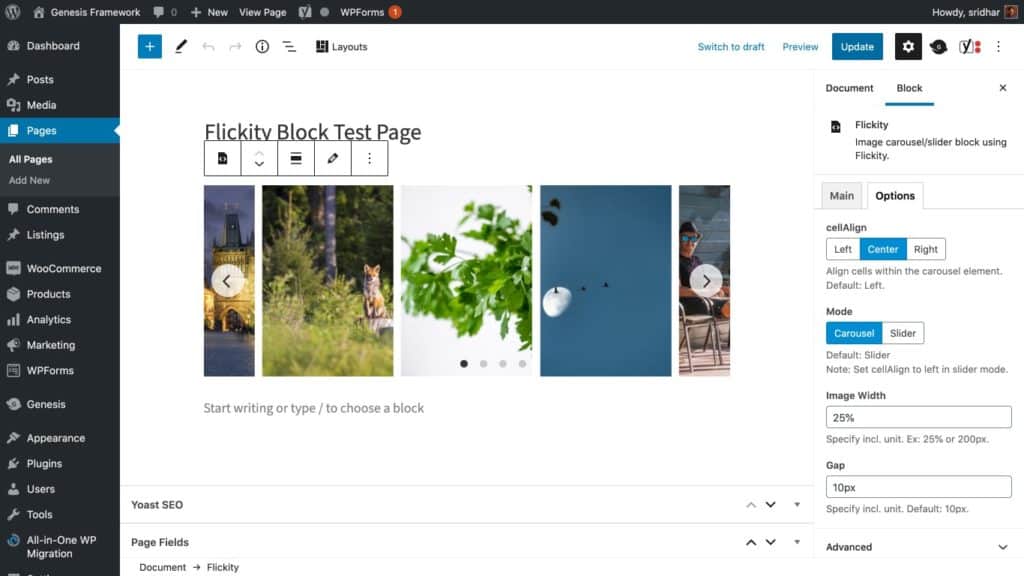
- custom fields to add options (like the gap between the slide images) so users can configure the block
- a Gallery field instead of a Repeater
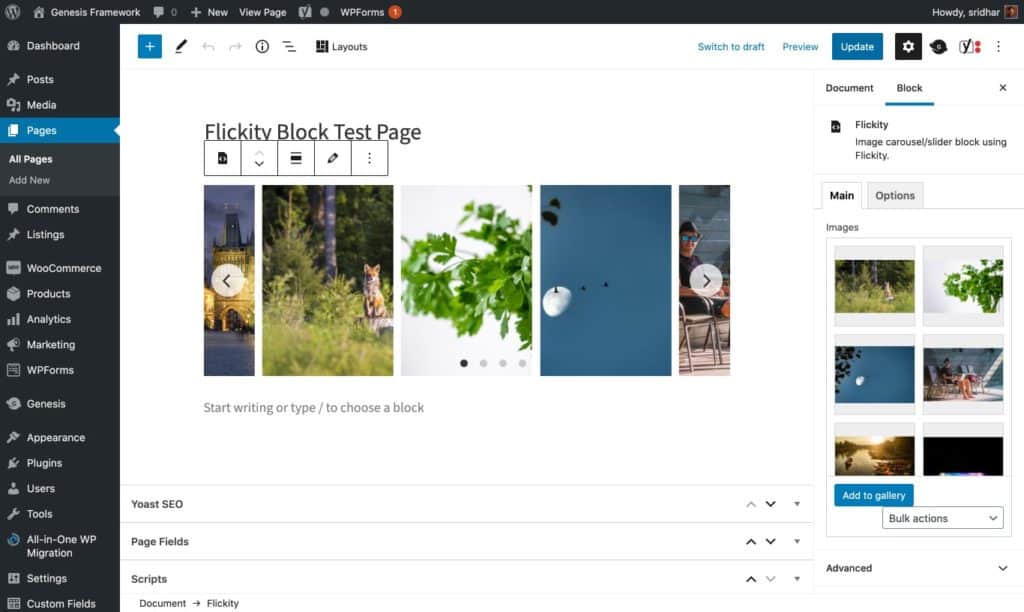
Screenshots:
Screencast:
The finished plugin can be found on Github here.
Step 0 – ACF Pro
Ensure that ACF Pro is installed and is active.
Step 1 – Block Registration
Download My Custom Functionality plugin.
Extract the zip file and rename the plugin folder to say, block-flickity.
Open the folder in your favorite code editor.
Edit plugin.php.
Update the info in the plugin’s comment header.
Ex.:
Plugin Name:	Block - Flickity
Plugin URI:		https://wpdevdesign.com
Description:	Custom Gutenberg block for showing images as slider/carousel using Flickity - Needs ACF Pro.
Version:		1.0.0
Author:			Sridhar Katakam
Author URI:		https://wpdevdesign.com
License:		GPL-2.0+
License URI:	http://www.gnu.org/licenses/gpl-2.0.txt
Replace
add_action( 'wp_enqueue_scripts', 'custom_enqueue_files' );
/**
 * Loads <list assets here>.
 */
function custom_enqueue_files() {
	// if this is not the front page, abort.
	// if ( ! is_front_page() ) {
	// 	return;
	// }

	// loads a CSS file in the head.
	// wp_enqueue_style( 'highlightjs-css', plugin_dir_url( __FILE__ ) . 'assets/css/style.css' );

	/**
	 * loads JS files in the footer.
	 */
	// wp_enqueue_script( 'highlightjs', plugin_dir_url( __FILE__ ) . 'assets/js/highlight.pack.js', '', '9.9.0', true );

	// wp_enqueue_script( 'highlightjs-init', plugin_dir_url( __FILE__ ) . 'assets/js/highlight-init.js', '', '1.0.0', true );
}
with
// Register a custom image size for images in the slider/carousel.
add_image_size( 'flickity_image', 500, 726, true );

add_action( 'acf/init', 'block_flickity_acf_init_block_types' );
/**
 * Register a custom block using ACF Pro.
 */
function block_flickity_acf_init_block_types() {

	// Check function exists.
	if ( function_exists( 'acf_register_block_type' ) ) {

		// register a Flickity block.
		acf_register_block_type(
			array(
				'name'            => 'flickity',
				'title'           => __( 'Flickity' ),
				'description'     => __( 'Image carousel/slider block using Flickity.' ),
				'render_template' => plugin_dir_path( __FILE__ ) . 'template-parts/blocks/flickity/flickity.php',
				'category'        => 'media',
				'icon'            => 'media-code',
				'keywords'        => array( 'carousel', 'slider', 'flickity' ),
				'enqueue_assets'  => function() {
					wp_enqueue_style( 'flickity', plugin_dir_url( __FILE__ ) . 'template-parts/blocks/flickity/flickity.min.css' );
					wp_enqueue_style( 'block-flickity', plugin_dir_url( __FILE__ ) . 'template-parts/blocks/flickity/block-flickity.css' );

					wp_enqueue_script( 'flickity', plugin_dir_url( __FILE__ ) . 'template-parts/blocks/flickity/flickity.pkgd.min.js', '', '2.2.1', true );
					wp_enqueue_script( 'flickity-init', plugin_dir_url( __FILE__ ) . 'template-parts/blocks/flickity/block-flickity.js', array( 'flickity' ), '1.0.0', true );
				},
			)
		);

	}
}
We are registering a custom image size called flickity_image and specifying the width and height that the images in the slider/carousel should be shown in.
If the images the user is going may set in the block are already present in the media library, regenerate thumbnails.
We are also registering a custom block named flickity while setting the block template php file and defining the assets that should load for each instance of the block, both in the WordPress editor and on the front end.
Things to note:
- We have given the name identifier for the block,
flickity. In practical use, it is probably better to add your own prefix likewpdd-flickityso there is no collision with other blocks that may have the same name. - The block’s render template has been set to
template-parts/blocks/flickity/flickity.php. This file is the one that will contain the PHP to output the block. - Regarding the category in which the block is to appear when users press the big + button at the top left, both ACF’s and official WP docs are not up-to-date as of today. In this case, MEDIA makes the most sense. I just took a guess and set it as
mediaand it worked.
The block is set to load these files:
flickity.min.css– Flickity’s CSSblock-flickity.css– our custom CSS for the blockflickity.pkgd.min.js– Flickity’s JSblock-flickity.js– our custom JS for the block
Upload the plugin and activate it.
Step 2 – Custom Fields
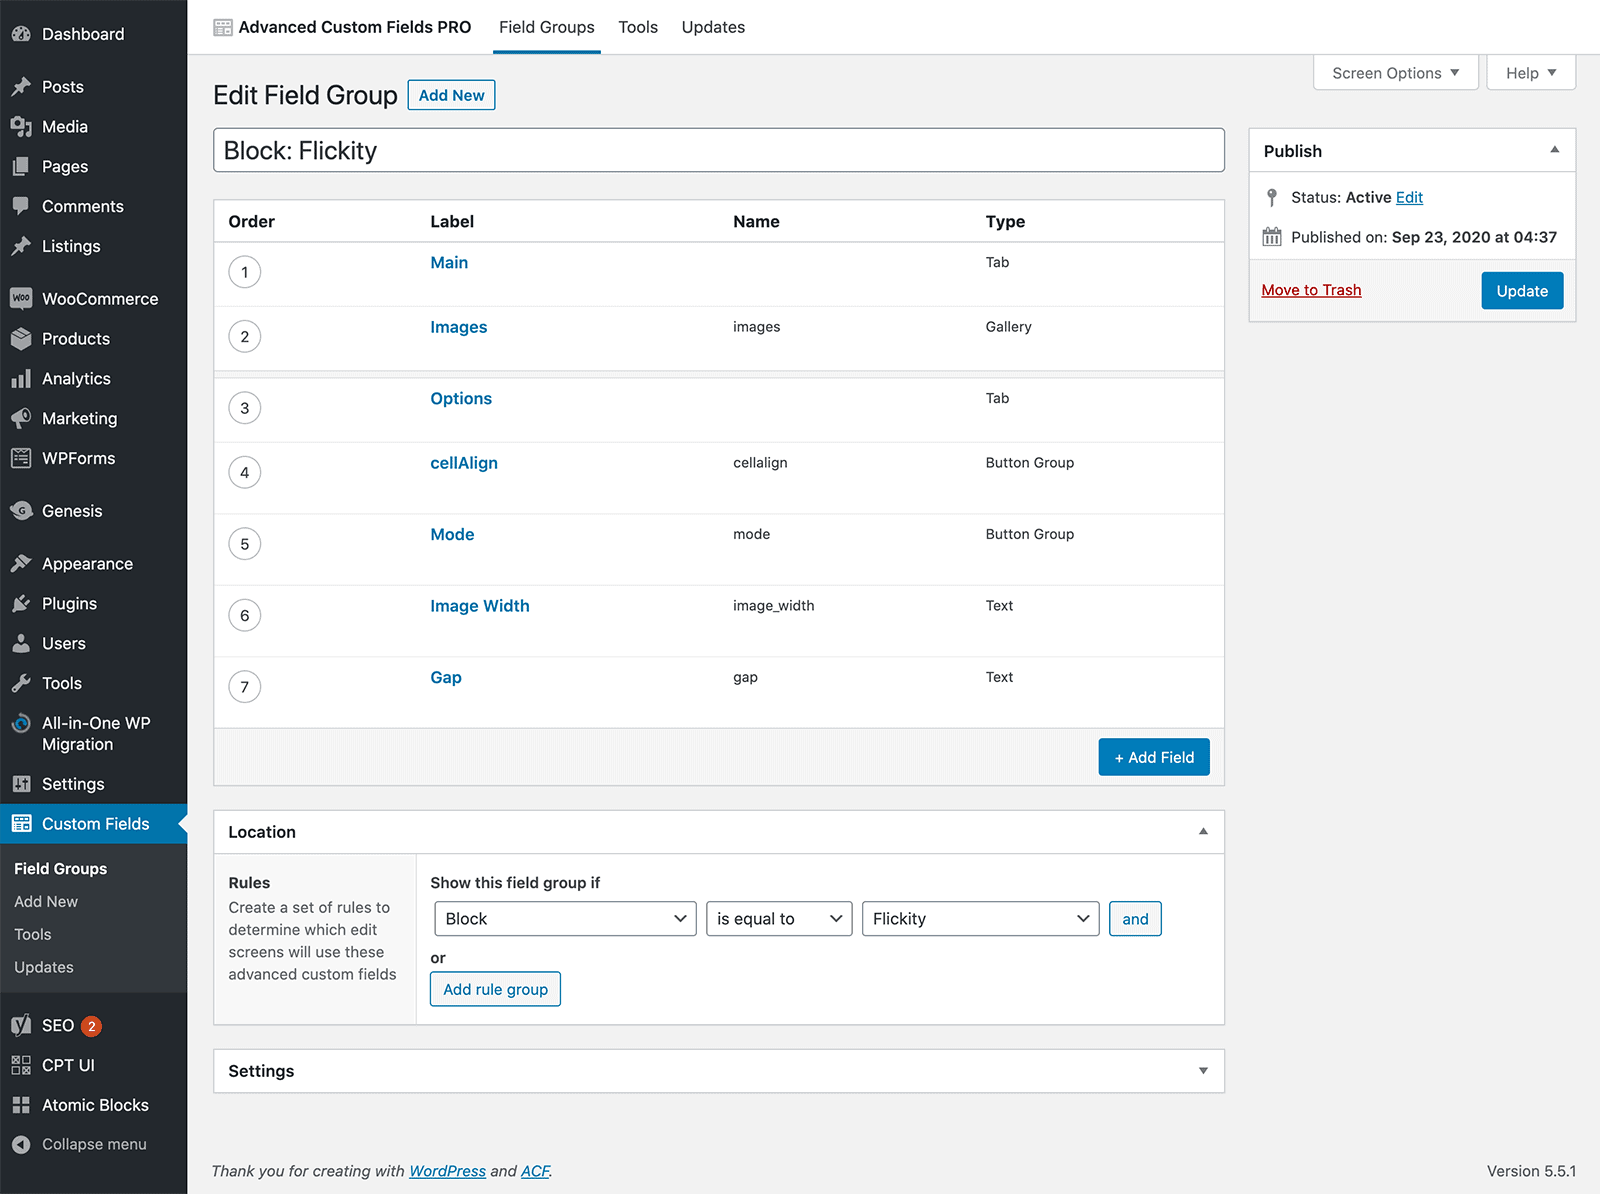
Register your custom fields group at Custom Fields > Add New.
Here‘s an export of the field group that you can import if you wish via Custom Fields > Tools.

In the Location meta box, add a rule to have the field group appear on the custom block.
Step 3 – Block Template
When registering the block, we set
'render_template' => plugin_dir_path( __FILE__ ) . 'template-parts/blocks/flickity/flickity.php',Time to set this up.
In the plugin directory, create template-parts directory and inside that, blocks directory and inside that, flickity directory. Create a file named flickity.php inside that. These directory and file names can be any and need not match the name given to the block.
Add the following code in flickity.php:
<?php

/**
 * Flickity Block Template.
 *
 * @param   array $block The block settings and attributes.
 * @param   string $content The block inner HTML (empty).
 * @param   bool $is_preview True during AJAX preview.
 * @param   (int|string) $post_id The post ID this block is saved to.
 */

// Create id attribute allowing for custom "anchor" value.
$id = 'flickity-' . $block['id'];

if ( ! empty( $block['anchor'] ) ) {
	$id = $block['anchor'];
}

// Create class attribute allowing for custom "className" and "align" values.
$className = 'flickity';

if ( ! empty( $block['className'] ) ) {
	$className .= ' ' . $block['className'];
}
if ( ! empty( $block['align'] ) ) {
	$className .= ' align' . $block['align'];
}

$images      = get_field( 'images' );
$cellalign   = get_field( 'cellalign' );
$wraparound  = get_field( 'mode' );
$image_width = get_field( 'image_width' ) ?: '25%';
$gap         = get_field( 'gap' ) ?: '10px';

$size = 'flickity_image'; // (thumbnail, medium, large, full or custom size)

?>
<section id="<?php echo esc_attr( $id ); ?>" class="<?php echo esc_attr( $className ); ?>">
<?php
if ( $images ) {
	printf(
		'<div class="images-container" data-cellalign="%s" data-wraparound="%s">',
		esc_attr( $cellalign ),
		esc_attr( $wraparound )
	);
	foreach ( $images as $image ) {
		printf(
			'<img src="%s" alt="%s" width="%s" height="%s" style="margin-right: %s;">',
			esc_attr( wp_get_attachment_image_url( $image['ID'], $size ) ),
			esc_attr( $image['alt'] ),
			esc_attr( $image_width ),
			$image['sizes'][ $size . '-height' ],
			esc_attr( $gap ),
		);
	}
	echo '</div>';
} else {
	echo 'No images found. Add/select some by clicking on the "Add to gallery" button.';
}
?>
</section>
Note
$className = 'flickity';Here we are setting the class for each block’s section element.
Ex.:
<section id="flickity-block_5f6ad3d691579" class="flickity">
...
We are getting the gallery field’s value, looping over the images and for each image setting the HTML that should be generated.
Dynamic CSS
To set CSS property’s value from the custom field values (when editing the block), we can simply add it inline like this:
style="margin-right: %s;"where %s in this case is, esc_attr( $gap ).
Dynamic JS
One way to retrieve the custom field values (when editing the block) in the block’s JS file is using data attributes.
With
printf(
	'<div class="images-container" data-cellalign="%s" data-wraparound="%s">',
	esc_attr( $cellalign ),
	esc_attr( $wraparound )
);
in place, cellalign and mode custom fields’ values can be accessed in block-flickity.js like this:
cellAlign: $images_container.data( 'cellalign' )and
wrapAround: $images_container.data( 'wraparound' )Note:
$wraparound = get_field( 'mode' );Step 4 – Block JS
Create a file named block-flickity.js in
/wp-content/plugins/block-flickity/template-parts/blocks/flickity
having:
(function ($) {
	/**
	 * initializeBlock
	 *
	 * Adds custom JavaScript to the block HTML.
	 *
	 * @date    23/11/20
	 * @since   1.0.0
	 *
	 * @param   object $block The block jQuery element.
	 * @param   object attributes The block attributes (only available when editing).
	 * @return  void
	 */
	var initializeBlock = function ($block) {
		$images_container = $block.find('.images-container');

		$images_container.flickity({
			imagesLoaded: true, // re-positions cells once their images have loaded
			groupCells: true, // group cells that fit in carousel viewport
			cellAlign: $images_container.data( 'cellalign' ),
			freeScroll: true, // enables content to be freely scrolled and flicked without aligning cells to an end position
			wrapAround: $images_container.data( 'wraparound' ),
		});
	};

	// Initialize each block on page load (front end).
	$(document).ready(function () {
		$('.flickity').each(function () {
			initializeBlock($(this));
		});
	});

	// Initialize dynamic block preview (editor).
	if (window.acf) {
		window.acf.addAction(
			'render_block_preview/type=flickity',
			initializeBlock
		);
	}
})(jQuery);
We are defining a function named initializeBlock that should be run for each block both in the editor and on the front end.
Inside this function we are initializing Flickity on .images-container, the div that is inside our block’s section. Using dynamic JS as mentioned in the previous step, we are setting Flickity’s options to defaults/user selected values.
.flickity in
// Initialize each block on page load (front end).
$(document).ready(function () {
	$('.flickity').each(function () {
		initializeBlock($(this));
	});
});
refers to the base class set in
$className = 'flickity';flickity in
// Initialize dynamic block preview (editor).
if (window.acf) {
	window.acf.addAction(
		'render_block_preview/type=flickity',
		initializeBlock
	);
}
refers to
'name' => 'flickity',when registering the block.
Step 5 – Block CSS
Create a file named block-flickity.css in /wp-content/plugins/block-flickity/template-parts/blocks/flickity having:
.flickity-button {
	padding: 1px 6px;
}

.flickity-button:focus,
.flickity-button:hover {
	color: #333;
}

.flickity-prev-next-button .flickity-button-icon {
	width: 40%;
	height: 40%;
	left: 30%;
	top: 32%;
}
That’s it!
Hopefully this has served you as an example of how to register a custom block using ACF Pro and doing it via a plugin with custom field values set dynamically in CSS and JS.


