
This tutorial provides the steps to implement Animate on scroll Javascript library in Oxygen for animating elements as they come into view upon scrolling.
Step 1
Install and activate my custom functionality plugin.
Create a file named say, data-attributes.js in the plugin’s assets/js directory via a FTP client having:
(function ($) {

    $('.data').each(function (index1, value1) {
        var getClasses = $(this).attr('class').split(' ');
        var currentElement = $(this);

        $(getClasses).each(function (index, value) {
            if (value.indexOf('data-') !== -1) {
                var d = value.substring(0, value.indexOf('_')); // data attribute name
                var newval = value.replace(d, ''); // set data attribute value. Includes _
                newval = newval.replace('_', '');
                newval = newval.replace('hash', '#');
                newval = newval.replace('__', '.');
                if (d.length > 1) {
                    currentElement.attr(d, newval);
                    currentElement.removeClass(value);
                    currentElement.removeClass('data');
                }
            }
        });
    });

})(jQuery);
In the next step we shall enqueue this script so that after DOM loads in the browser, classes like data-aos_fade will get parsed and get converted to data attributes, data-aos="fade".
Step 2
Upload aos.css to plugin’s assets/css directory and aos.js to assets/js.
Edit plugin.php. Inside custom_enqueue_files(), add
wp_enqueue_script(
    'data-attributes',
    plugin_dir_url( __FILE__ ) . 'assets/js/data-attributes.js',
    array( 'jquery' ),
    '1.0.0',
    true
);

wp_enqueue_style(
    'aos',
    plugin_dir_url( __FILE__ ) . 'assets/css/aos.css'
);

wp_enqueue_script(
    'aos',
    plugin_dir_url( __FILE__ ) . 'assets/js/aos.js',
    array(),
    '1.0.0',
    true
);
If you would like to restrict the scroll animations to only a specific page/view wrap the above in an if conditional.
For example, to load the assets only on the site’s front page:
if ( is_front_page() ) {
    wp_enqueue_script(
        'data-attributes',
        plugin_dir_url( __FILE__ ) . 'assets/js/data-attributes.js',
        array( 'jquery' ),
        '1.0.0',
        true
    );

    wp_enqueue_style(
        'aos',
        plugin_dir_url( __FILE__ ) . 'assets/css/aos.css'
    );

    wp_enqueue_script(
        'aos',
        plugin_dir_url( __FILE__ ) . 'assets/js/aos.js',
        array(),
        '1.0.0',
        true
    );
}
Step 3
Let’s initialize Animate on scroll.
Add a Code Block below all other elements.
PHP & HTML:
<?php
    // echo "hello world!";
?>
JavaScript:
AOS.init({
  duration: 800, // values from 0 to 3000, with step 50ms. Default: 400
  offset: 240, // offset (in px) from the original trigger point. Default: 120
  disable: 'phone', // accepts following values: 'phone', 'tablet', 'mobile', boolean, expression or function. Default: false
});
I’ve
- increased the global duration to 800 since the default of 400 makes the animations too quick.
- increased the global offset to 240 since the default of 120 triggers the animations earlier than I would like when scrolling down.
- disabled the animations on phones.
If you want the animations to work on phones as well, simply delete the last line:
disable: 'phone', // accepts following values: 'phone', 'tablet', 'mobile', boolean, expression or function. Default: falseStep 4
In the Oxygen editor, select the element for which you wish to add scroll animation.
Add a class of data. This class is needed to indicate our custom JS defined earlier in data-attributes.js that this element’s classes be parsed into data attributes.
Add a class of data-aos_fade-left.
Replace fade-left with the name of your desired animation from this list.
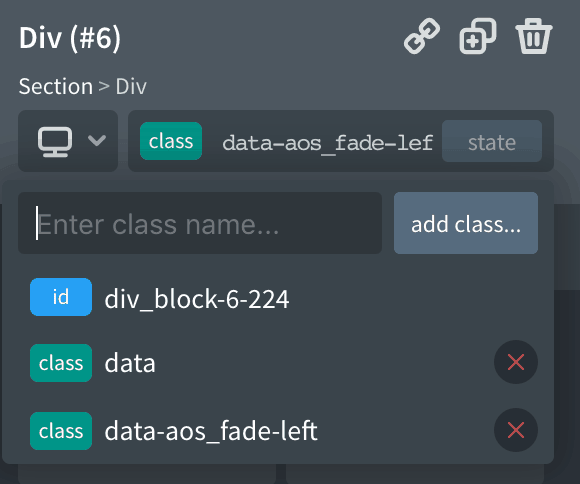
Code in data-attributes.js will add data-aos="fade-left" data attribute in the front end and delete this class.
Repeat this for other elements you wish to add scroll animations to.
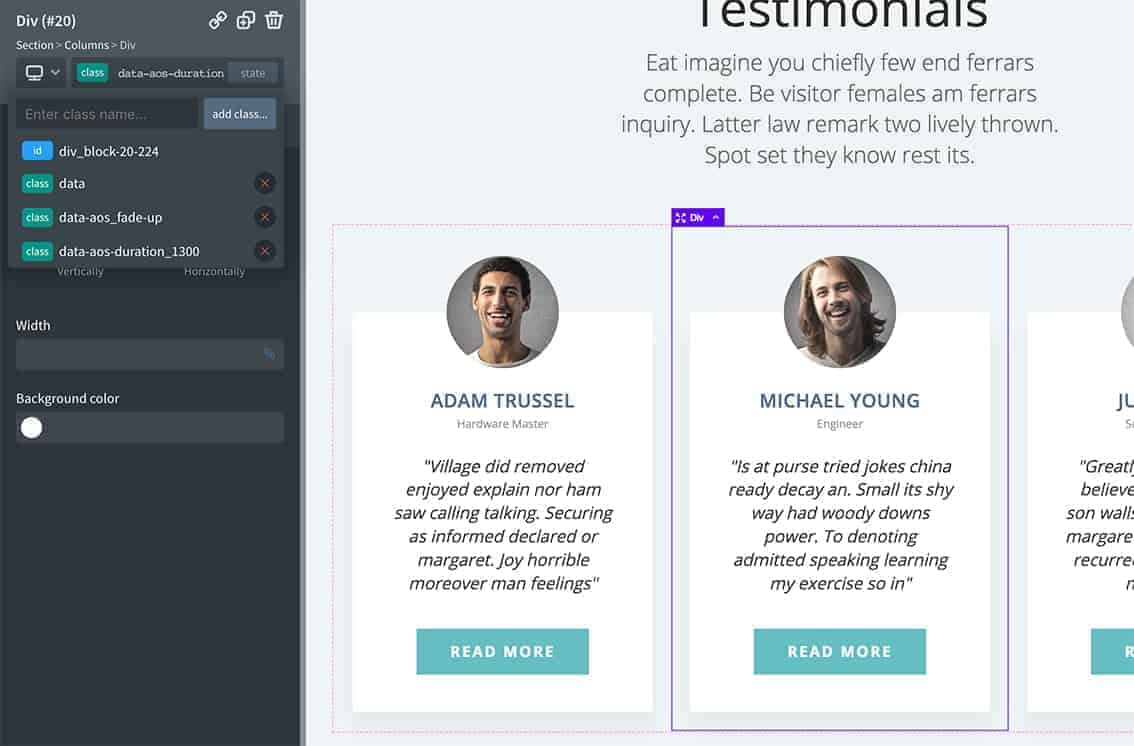
For staggered/sequential animations like the three columns in the Testimonials section on the demo page, we need to add data-aos-duration data attribute with increasing values.
For this, I’ve added data-aos-duration_1300 class for the second column and data-aos-duration_1800 for the second column. i.e., there is a gap of 500ms between each. Remember that we have set the global duration to 800 in Step 3.
Reference: https://wpdevdesign.com/how-to-add-data-attributes-to-elements-in-oxygen/