
Most tutorials in this site that involve loading external assets (typically js and css files) require you to define where all they should be enqueued (loaded) in a custom functionality plugin.
For example let’s say you want to use Flickity on the homepage for turning the Divs of Oxygen‘s Repeater into carousel items. The conventional process is to load Flickity conditionally so it only loads on the homepage and then initialize it (either in a js file or in a Code Block).
Tomorrow you or your client decides that there should be a carousel on one or more pages. For this you would need to edit the custom functionality plugin’s file and modify the if conditional accordingly to tell WordPress where all your assets should be loading.
This is tedious, error-prone and time consuming – especially if your client wants to add a few carousels on other pages themselves.
There is a better method: Register your assets first and enqueue in-place later on demand.
In this tutorial I am going to show you how we can create a Re-usable Template in Oxygen that will contain for example, a Repeater and a Code Block which when placed in any Page or Template will convert the Repeater into a responsive touch-friendly carousel. Since the re-usable can be placed as an editable instance, we can change what and how the Repeater outputs and also change the parameters of the Flickity initialization script – a self-contained re-usable, if you will.
Once the one-time setup (of registering the needed assets) is done, anytime a carousel is to be added you just add the Re-usable and optionally make any changes you need.
Sample screenshots:
Latest posts carousel on an inner page:

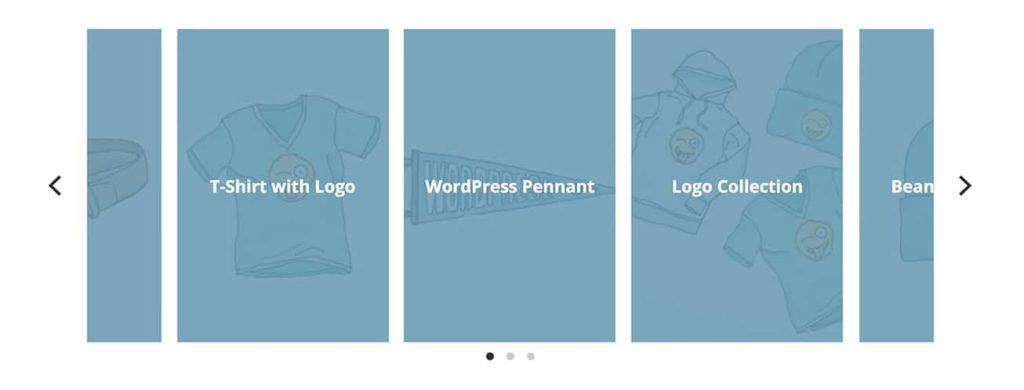
Latest products carousel on the homepage:
These are some benefits of the approach:
- Assets will be loaded conditionally without having to specify where via an if condition meaning – there will be no bloat on other pages as your custom styles and scripts won’t be loaded there.
- Ease of use.
- No conflict or problem with loading multiple instances as WordPress will only load the assets once per page regardless of how many times enqueue happens per page.
- Makes it possible for users to share/sell JavaScript/jQuery effects and solutions before the official Oxygen Elements API is released. Note: You’d still need a companion plugin in which the assets are stored and registered.
Step 1
Install and activate My Custom Functionality plugin.
Connect to your hosting account using a FTP client and navigate to site’s /wp-content/plugins/my-custom-functionality-master.
Upload flickity.min.css to the plugin’s assets/css directory.
Upload flickity.pkgd.min.js to the plugin’s assets/js directory.
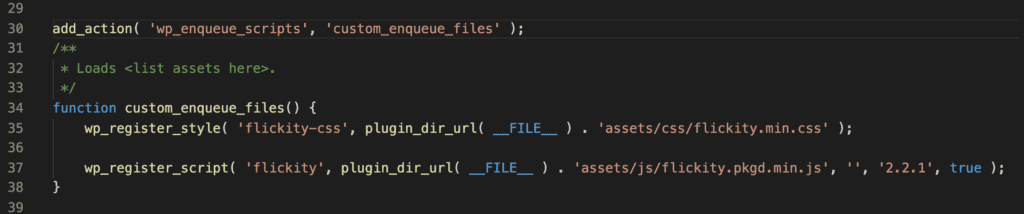
Edit plugin.php and add the following inside the custom_enqueue_files() function:
wp_register_style( 'flickity-css', plugin_dir_url( __FILE__ ) . 'assets/css/flickity.min.css' );

wp_register_script( 'flickity', plugin_dir_url( __FILE__ ) . 'assets/js/flickity.pkgd.min.js', '', '2.2.1', true );
Screenshot:
Here we are only registering the assets but not asking WordPress to load them anywhere.
Later wherever these need be loaded, we simply enqueue them like this:
wp_enqueue_style( 'flickity-css' );

wp_enqueue_script( 'flickity' );
We don’t have to make any changes in the files of custom functionality plugin after this.
Step 2
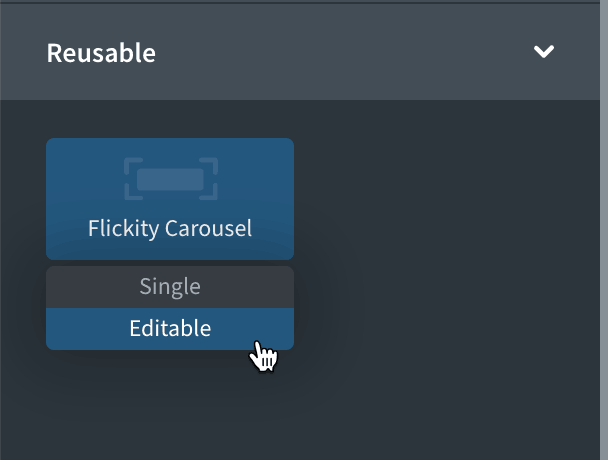
Let us create a Re-usable.
You can either create one from the Templates listing screen or in any Template/Page and make it a re-usable.
In my test site I created one named Flickity Carousel at Oxygen > Templates > Add New Reusable Part (button).
Edit it with Oxygen.
Add a Section or a Div depending on whether this should be its own top-level Section or a Div that you want placed inside a Section.
In this example, let’s add a Div.
Width: 100%.
Add a Repeater inside.
Give this a class name say, posts-carousel.
Set the Query to manual with these params:
post_type=post&posts_per_page=8&no_found_rows=trueHere we are asking WordPress to fetch exactly 8 recent posts from the database and no more.
You may be tempted to set the Layout to stack child elements horizontally so the Repeater Divs can be seen in columns. But in doing so you will be setting the display to flex and Flickity needs it to be block. Therefore, do not do that and if you did, just undo your selection, go to Advanced > Layout and deactivate flex so the display will default to block (won’t be seen visually in Oxygen).
Click on the Repeater’s Div.
Horizontal item alignment and vertical item alignment: Center and Middle.
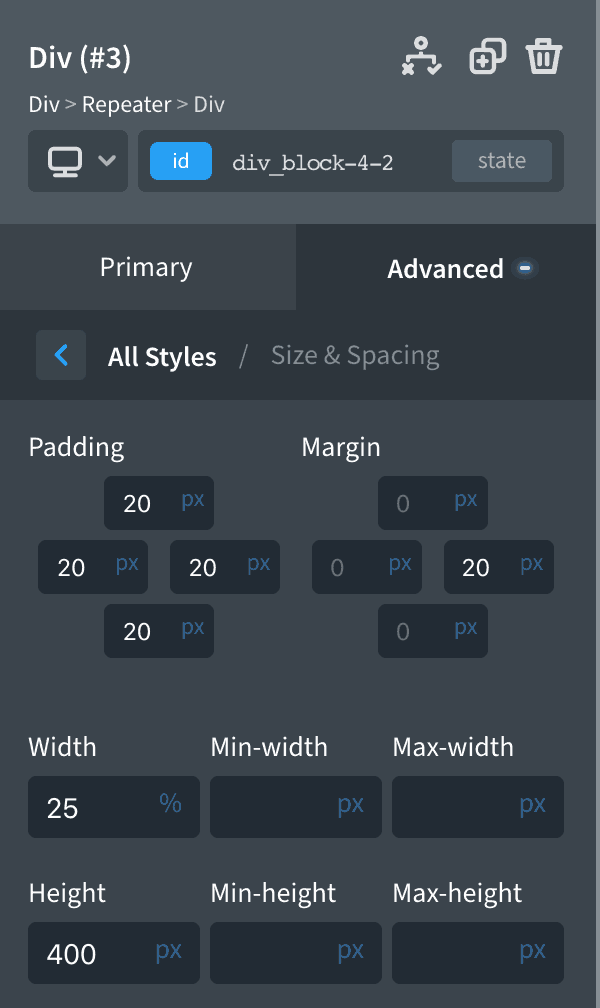
Width: 25%.
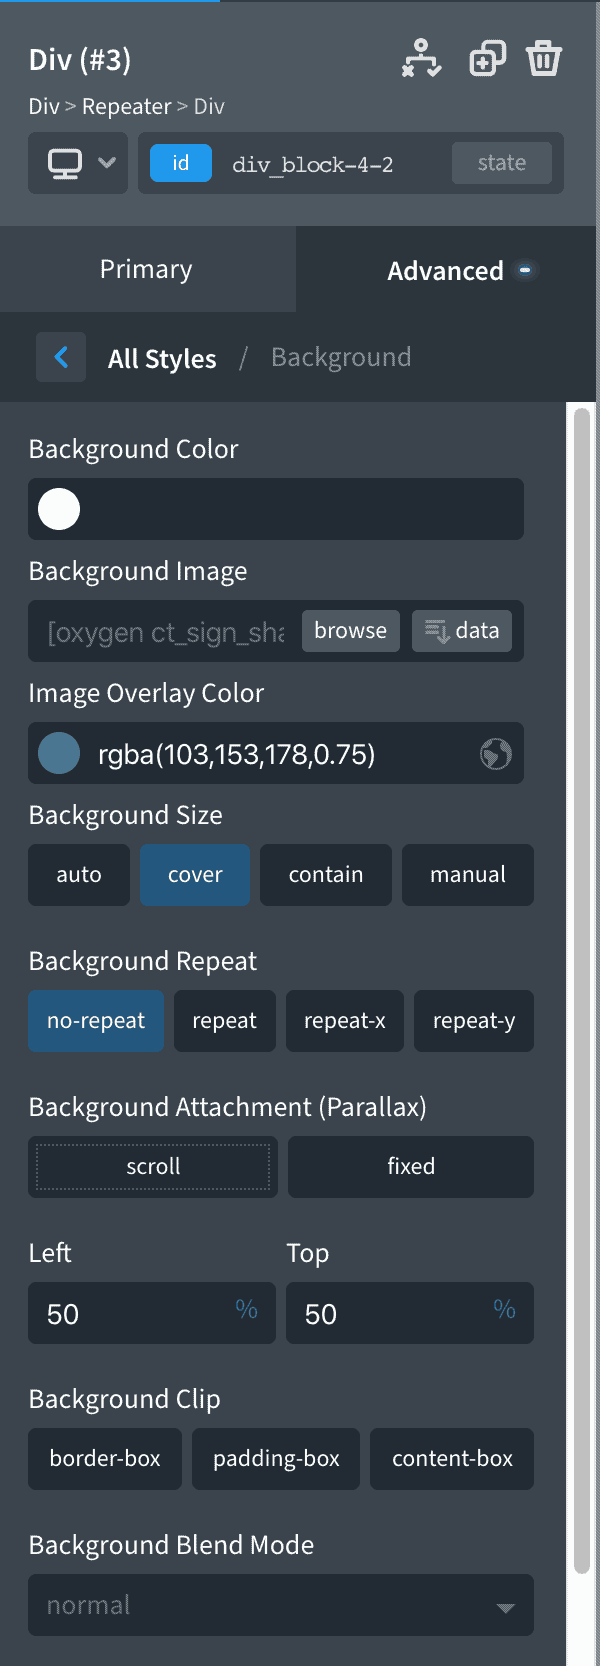
At Advanced >Background click “data” for Background Image > Featured Image > Size – Medium > Insert.
Set a darksish Image Overlay Color like rgba(103,153,178,0.75).
Background Size: Cover
Background Repeat: no-repeat
Left: 50%
Top: 50%
At Advanced > Size & Spacing:
Add a Heading inside the Div.
Font Size: 22px
Tag: h2 (or h3 or h4 as you like)
Line Height: 1.2
Double click and select all the default text > Insert Data > Post Title > Tick Link > Insert.
You should now be having the Posts appearing one below the other with post titles appearing in blue (or whatever is the color from sitewide settings for hyperlinks).
Add a Code Block below and alongside the Repeater inside the Div.
PHP & HTML:
<?php
	wp_enqueue_style( 'flickity-css' );
	wp_enqueue_script( 'flickity' );
?>
CSS:
.posts-carousel .ct-headline a {
  color: #fff;
}

.posts-carousel .flickity-prev-next-button.previous {
	left: -60px;
}

.posts-carousel .flickity-prev-next-button.next {
	right: -60px;
}

@media only screen and (max-width: 1200px) {

	.posts-carousel .flickity-prev-next-button.previous,
	.posts-carousel .flickity-prev-next-button.next {
		display: none;
	}

}
JavaScript:
(function ($) {

	$('.posts-carousel').flickity({
		// Groups cells together in slides. Flicking, page dots, and previous/next buttons are mapped to group slides, not individual cells. is-selected class is added to the multiple cells in the selected slide.

		// if set to a percent string, group cells that fit in the percent of the width of the carousel viewport.
		groupCells: '80%',

		// At the end of cells, wrap-around to the other end for infinite scrolling.
		wrapAround: true,

		// Unloaded images have no size, which can throw off cell positions. To fix this, the imagesLoaded option re-positions cells once their images have loaded.
		imagesLoaded: true,
	});

})(jQuery);
Here we are loading the assets needed for Flickity to run and initializing it on all elements that have a class of posts-carousel. This was the class we added to our Repeater.
Flickity has a ton of options and you can read more about it all here.
You will likely see the below error in the Oxygen editor.
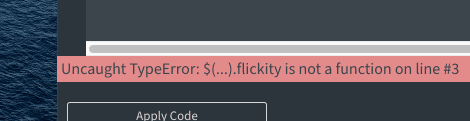
It can safely be ignored. But if you would like to get rid of it, just add
if(window.angular) return;before the
$('.posts-carousel').flickity({line.
Step 3
Our self-contained reusable is now ready to be used in any Page/Template.
To test, edit say your homepage (a Page set as static homepage set at Settings > Reading) with Oxygen. If you have the blog posts roll showing up on the homepage instead, you would edit the Template that has been set to apply to Blog Posts Index.
Add a new Section or inside an existing Section,
Add your reusable as editable.
Visit the page on the front end and you should now have a working posts carousel.
You can make any changes specific to this instance of the carousel as you need.
For example, to show entries of product post type instead of the default post, change the manual query params to
post_type=product&posts_per_page=8&no_found_rows=trueRemember the Code Block has the code that loads Flickity and initializes it and that is what makes it work.
If you want to use more than 1 instance of the reusable on a given page with different options in the init code for the different instances, you would need to change the selector from the class to the ID of your container element.
Ex.:
change .posts-carousel to something like #_dynamic_list-76-25 in
$('.posts-carousel').flickity({where _dynamic_list-76-25 is the ID of the corresponding Repeater.
That’s it!
I have a feeling Oxygen’s Elements API is around the corner and when that happens users will most likely purchase a 3rd-party element pack that will provide an interface for all the options for these kind of scripts. Regardless, this should act as a nice way to go about using custom scripts in Oxygen in the meantime or even later if you are a hands-on type of user like me.