Vultr High Frequency Cloud Compute + GridPane = Super Fast WordPress

Vultr Discount
Vultr provides $50 free credit for new account signups.
Intro
I have been researching this last week about renting a VPS (Virtual Private Server) for my upcoming “Oxygen maintenance (site care) with hosting” service and scoured a number of websites, hosting forums, blog posts to find the best VPS I could find for around $20 a month budget.
My search ended up with Vultr’s Cloud Compute (
In this article, I am going to discuss the details of how to go about setting this combo up. This should be a useful guide to those who have only used shared cPanel hosting and are looking to take it to the next level whether it is for hosting WordPress sites for yourself or your clients.
The Basics
There are several VPS providers out there and generally speaking, the server we get from them is unmanaged. Meaning, unless you are a Linux guru or system admin it is not advisable to host serious business sites with them.
This is where server management companies like GridPane and RunCloud come into the picture. They configure your server by installing the necessary software packages, make it secure and provide an easy interface for creating and managing WordPress sites by click of a button.
The benefit of going this route over the traditional shared hosting is value for money where higher speed/performance is needed and especially when you want to run multiple WordPress websites without limitations that are unavoidable with shared hosting.
Summary of the process
- Pick a VPS provider like DigitalOcean, Vultr, Linode and create an account.
- Create an account at GridPane. Enter your VPS’ account API key in your GridPane account to link them.
- “Provision” a server at your chosen VPS provider from within GridPane. You are essentially renting server space in your chosen location directly from the VPS provider via GridPane.
- GridPane will then install server software needed for you to easily host and manage WordPress sites on your server.
- Your expenses for your VPS host and server management at GridPane are separate.
Disclaimers
- I am not an expert on this hosting or server admin stuff. I consider myself a WordPress developer.
- The hosting and server panel I selected
is my personal preference. So when I say “the best”, I mean “what’s best for me”. - There are affiliate links in the article – meaning if you click and end up signing up for the listed hosting or server management options I may get commission.
Expenses
Hosting
My top three VPS for around $20/month mark are:
- Vultr High Frequency Cloud Compute
128 GB SSD / 2 CPU / 4 GB RAM / 3 TB bandwidth for $24 / month - Upcloud
80 GB MaxIOPS / 2 CPU / 4 GB RAM / 4 TB bandwidth for $20 / month - Vultr Cloud Compute
80 GB SSD / 2 CPU / 4 GB RAM / 3 TB bandwidth for $20 / month
I went with #1.
For about $50 a month in total (Vultr VPS + GridPane), I will be able to easily host at least 40 normal WordPress sites with the best possible performance and load times w/o writing a single command in the terminal with 24/7 support on any questions related to how WordPress can be run in the most efficient manner on the server.
Server Management Panel
GridPane costs $30 a month for their Pro plan normally. But if you subscribe to the annual plan it comes down to $25/month.
RunCloud is
Why I still chose the slightly more (in the context of managing multiple servers) expensive GridPane:
- I read that tech stack (whatever it installs on the server to manage it) of GridPane has an edge over others i.e., it runs faster.
- GridPane’s CEO and staff members are in the various Facebook groups that I am a part of and I find their replies super detailed and helpful. Also interacted with them via live chat and find them friendly and approachable.
- WPJohnny of course.
- The other popular server management panel does not seem to have easy built-in staging.
GridPane Goodies
Support
Support is not an after-thought at GridPane. I have been impressed every time I hit their live chat that runs 24/7. GridPane is known for great customer support.
Single Sign On
Entering username and password is a thing of the past (you still can if you want to). Just click on the WordPress icon next to any site to automatically log into that site’s admin in your default browser. I love this feature!
Local Backups
Enable local backups by the flick of a switch individually per site.
Backups are run every hour on the hour 24/7. The local backups system stores an hourly backup for the past 12 hours, a daily backup for the past 7 days, a weekly backup for the past 4 weeks and a monthly backup for the past 3 months.
When you want to restore your site to a previous version, simply select one from the available backups and click the Restore Now button.
Migrate / Clone
Click on any existing site and in the popup go to Backups tab.
From here you can clone the site to the same server or to another if you have multiple by providing the new site URL with just a couple of clicks.
Staging
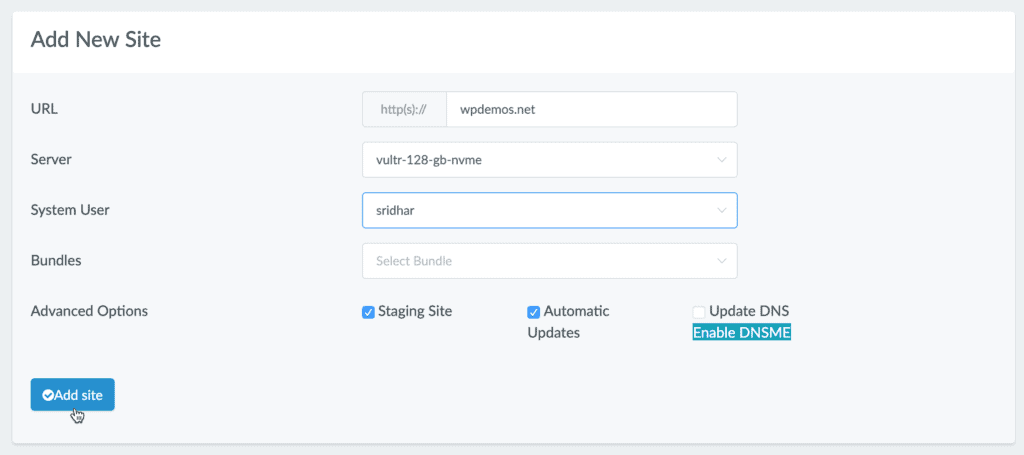
For each site you create at GridPane, you can pick whether staging should be enabled or not.
When it is, you can go to the Staging section in your account and copy the site from Live to Staging, work on it and when everything is okay, copy the site over from Staging to Live.
Download Full Site Export
Select from “Current Site” or “Hourly Backup” or “Daily Backup”, click on the “Export Now” button, and find the full site export in your server ready to be downloaded using a sFTP client. Backup archives expire after 4 hrs for security.
Multisite
Want to convert your single site into a WordPress Multisite?
Just turn on either “Sub-directory Multisite” or “Subdomain Multisite”.
Automatic Updates
This seems to be currently in a testing phase where their system takes before (updating WordPress and plugins) and after screenshots of the site on a separate install and if something is wrong, does not proceed with the update(s) on the actual site.
You can disable this if you want on a per-site basis.
Let’s get started
Step 1
Sign up for Vultr here. (The instructions are similar if you select a different VPS host)
You will receive free credit for $50 in your account.
Go to Billing and link your credit card. You need to link one to be able to create a server (we do this via GridPane in next step). Note that this is not possible with PayPal. You will not be billed.
Go to Account > API and enable API.
You will need to later paste this in your GridPane account to connect the two.
Add the following IPs of GridPane to the list of allowed ones to whitelist them:
35.199.11.215 / 32130.211.115.235 / 32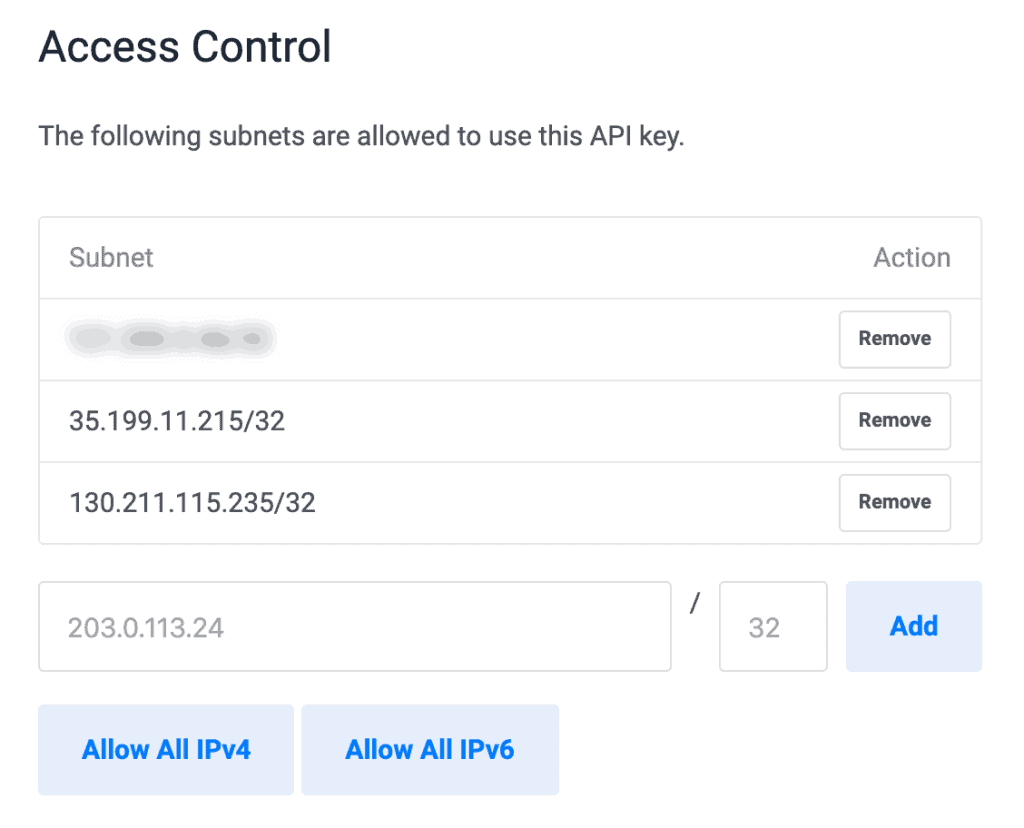
Step 2
Register your domain name, if you have not already. In this example, we are going to use NameCheap.
Step 3
Sign up for GridPane here.
a) Log into your account and go to Settings > VULTR API.
Add the API key from previous step.
b) Go to Home and click on Vultr.
Name: (something descriptive)
Server Plan: 4096 MB RAM, 128 GB DISK, 2 CPU Cores, $24.00/M
Available Regions: Pick the one where most of your site visitors are from.
Note: The price for automated backups by Vultr is 20% of your monthly fees. More info here.
I do not use this feature since I use internal (by GridPane) and external automated scheduled backups using All-in-One WP Migration to my pCloud and or Dropbox accounts.
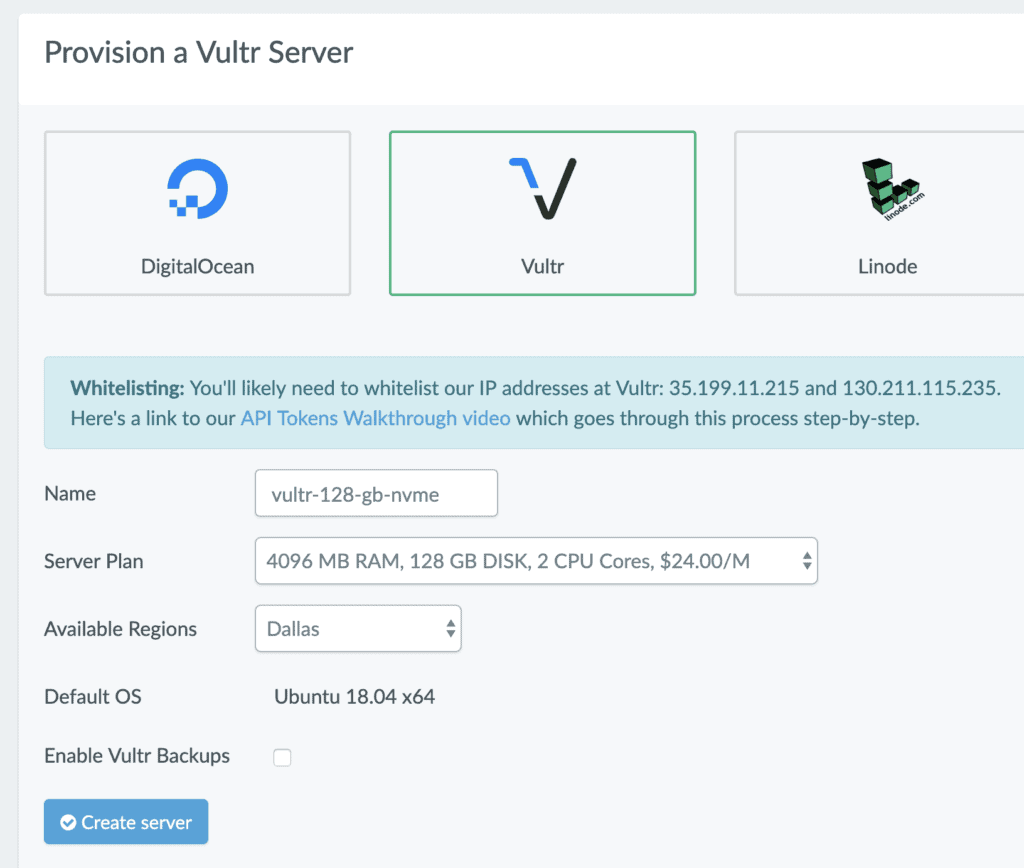
Create the server. This could take 2-3 minutes.
Save the server password in a secure place (I use 1Password). This will also be emailed to you.
When the server is ready, you will see a fully green bar under “Provisioned”.
c) Go to “System Users”.
By default, each WordPress site you create via GridPane will be “owned” by a user with this username: gridpane.
While not necessary, it is better to create a username (this is for the Operating System that runs on your VPS) say by your first name and also for each of your clients. That way, they will be isolated.
Follow this guide for instructions on how to create a system user.
Step 4
We shall use a free Cloudflare account to manage all the domain names at one central place and for protection against DDoS (Distributed Denial of Service) attacks and spam.
Sign up at Cloudflare if you do not already have an account and log in.
Add a new site by entering your domain name.
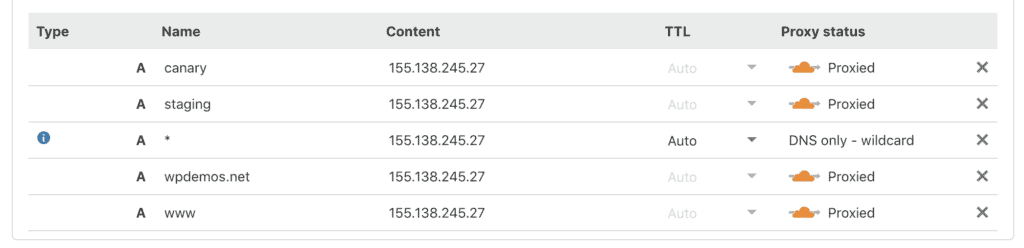
Go to DNS section and add A records for your main domain, www, staging, canary (for GridPane’s visually confirmed auto-update service which they are currently reworking and testing) like this:
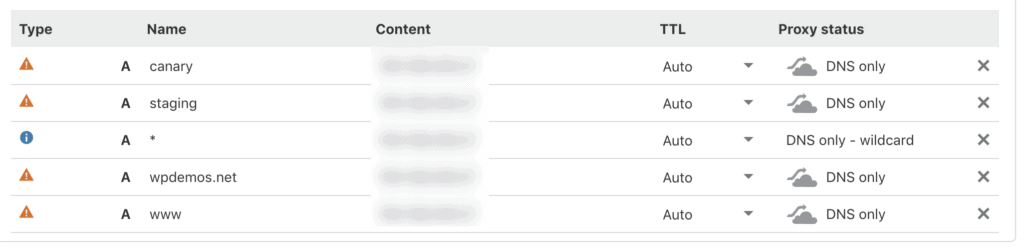
Replace wpdemos.net with your domain name.
You can copy the IP address of your server from your GridPane account.
Ensure that the cloud is set to gray for each row i.e., DNS only. We will turn it on later in a subsequent step.
Go to SSL/TLS section.
Change SSL dropdown from Full to Off. We will enable this later in a subsequent step.
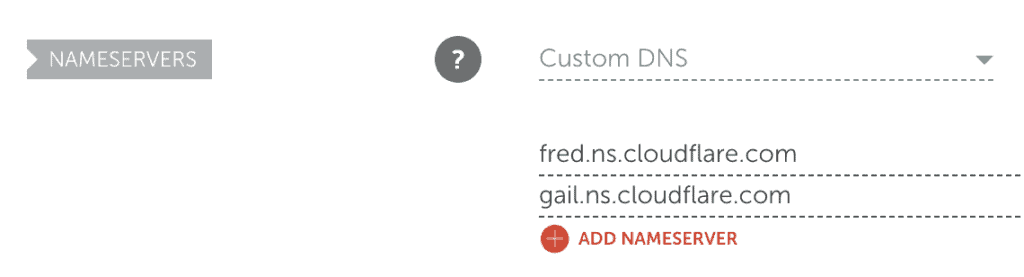
Log into your domain registrar and change the nameservers to those that Cloudflare provides.
d) Back to GridPane, go to Settings > Default WP Admin Settings.
Here you can optionally set your desired default admin username, email and password for the sites you are going to create.
Go to Sites.
Add a new site.
Wait for about 10 min for the DNS to propagate.
Click on the site name and in the popup, turn on SSL.
Also turn on 6G Waf.
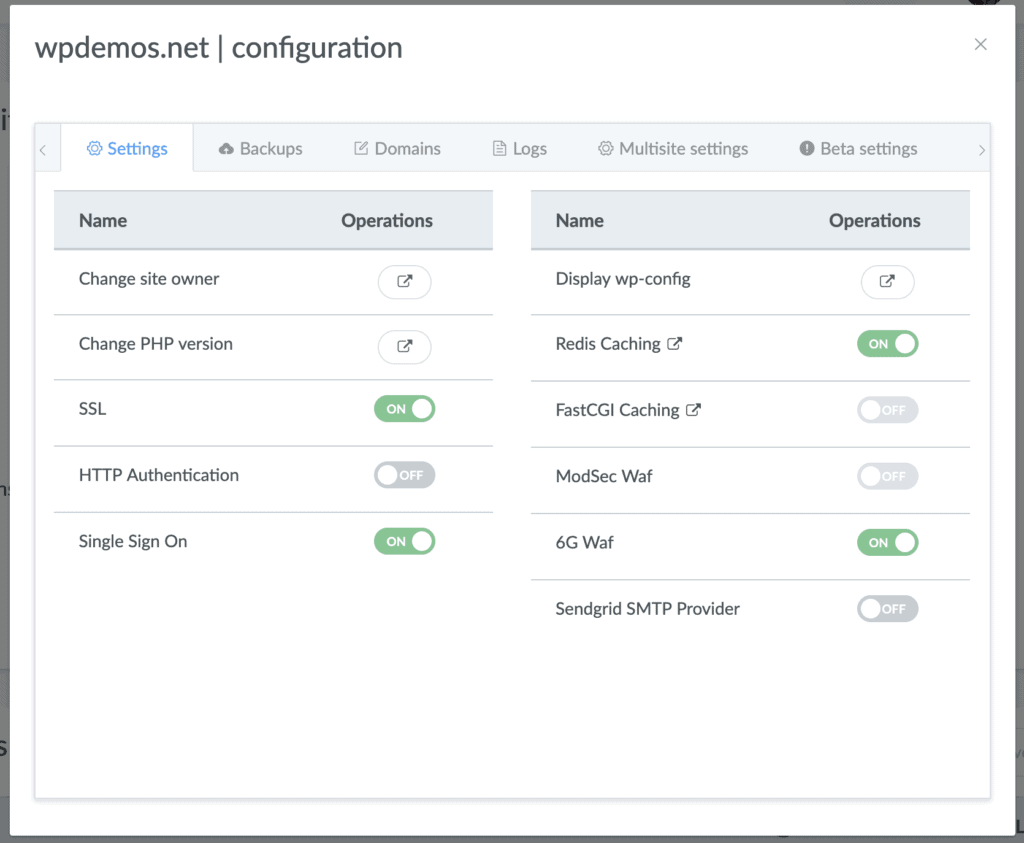
Redis Caching: This will be on by default. Does not actually activate caching but rather makes available server-level object caching and static caching.
Web Application Firewall: I asked GridPane support regarding the difference between “ModSec Waf” and “6G Waf” and here’s their reply:
The biggest difference between ModSec and 6G is the amount of effort needed to get things going.
6G is light weight and can actually work with zero configuration.
But ModSec/OWASP3+ is not so simple, it requires a more dev touch, and configuration to fit your site. We have included some whitelist rules for WordPress 5+ /Twentynineteen – specifically exclusions for the internal REST API endpoints.
If configured correctly ModSec is a much more powerful solution than 6G. Plus there is a perfomance penalty associated with it.
e) Back in Cloudflare, enable CF CDN by clicking on the gray cloud icons so they turn orange.
Go to SSL/TLS section and set SSL to Full.
f) Time to log into your new WordPress site.
In the sites’ list, click on the green WP icon next to your site to automagically get logged into your WordPress admin.
If you want to log in the usual way using username and password, you can get those credentials by viewing the Log.
Go to Settings > Permalinks. Select “Post name” and save changes.
g) Once your website building is complete, you might want to turn on the caching.
Let’s activate static caching.
Go to Settings > Nginx Helper.
Tick “Enable Purge”.
Select “Redis cache” as Caching Method.
Save all changes.
Go to Settings > Redis.
Let’s enable object caching.
Click “Enable Object Cache”.
To turn off caching, the recommended method is to go to Tools (in GridPane) > Quick Fixes > Clear All Nginx Caches.
What about Email?
Use MXroute.
I will write a follow-up tutorial where I show how unlimited domain and transactional emails can be set up using MXroute for just $30 for 100 GB for 3 years.
Conclusion
Once you spin up a server and add a few sites in GridPane, it becomes a second nature to use it for managing multiple servers and sites.
While not necessarily the cheapest, using Vultr with GridPane is a secure, easy, fast, efficient and performant way to host multiple WordPress sites.
References
VPS Showdown – September 2019 – DigitalOcean vs. Lightsail vs. Linode vs. UpCloud vs. Vultr
VPS Showdown – August 2019 – DigitalOcean vs. Lightsail vs. Linode vs. UpCloud vs. Vultr
Load Testing Vultr’s New
VPSBenchmarks 1, VPS Benchmarks 2
http://help.gridpane.com/en/articles/2470016-how-to-use-cloudflare-cdn-dns-ssl-with-gridpane-sites
http://help.gridpane.com/en/articles/2470355-using-gridpane-nginx-redis-caching