
In this tutorial we’ll look at a way that we can use the Repeater component to build previous and next post links for use on a Single Post template.
By using the repeater, we can visually build these elements and pull in any dynamic data we want from the posts, post title, excerpts, etc.
We’ll go through these steps;
- Building our repeater elements
- Filter the query to include only previous / next posts
- Adding our Previous / Next Post headings
- Changing the style depending on how many posts there are
Building our Post Links with the Repeater
After adding our repeater element onto the template, the first thing is to set it as a ‘manual’ query. Then set our Query params;
post_type=post&posts_per_page=2&no_found_rows=trueThis will make sure we’re only pulling in posts, there are no more than two posts showing and there will be no pagination from the repeater to worry about.
With the repeater, the posts can obviously be built in anyway we like. In our example, the whole posts inside the repeater are links.
This is done by first placing a link wrapper element inside the repeater div, with a height and width of 100% and then setting the URL to be the posts permalink found by clicking the ‘data’ button next to the URL field.
Inside this link wrapper we then place two elements, a text element for the post title and another text element that will be used for the ‘Previous Post’ or ‘Next Post’ text sitting above the post title. We can’t use a heading for the post title as it will be inside a link wrapper, but we can just use the style options to increase the font size to make it look like a heading.
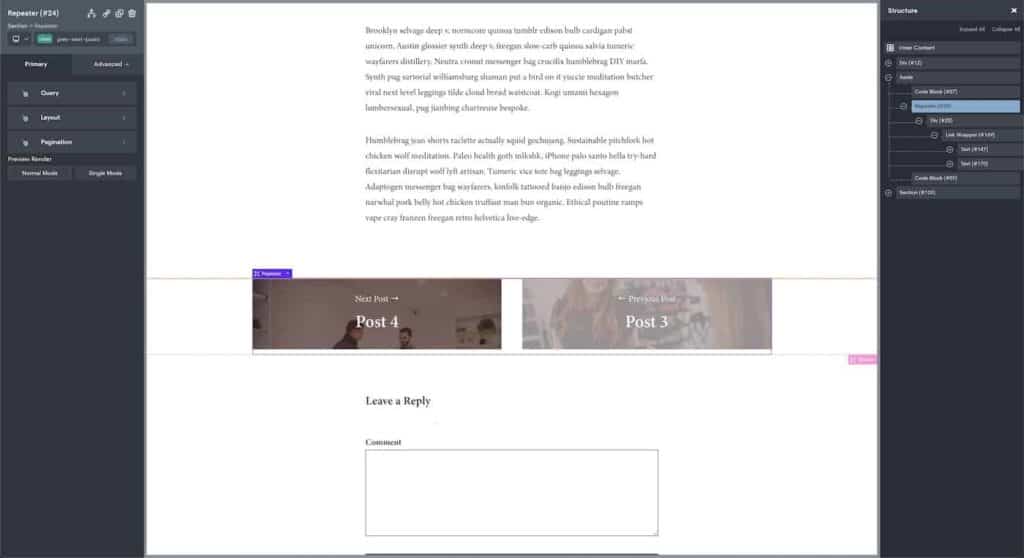
To get the post title from the post, after selecting the text element we click ‘insert data’ at the top of the page, selecting ‘title then leaving the ‘link’ box unchecked.
Lastly, the background image of the main repeater div is set to be the featured image of the post. In the demo, we’re giving the post a class of ‘prev-next-post’ so we can set add some padding (5%) and a width of 48% with a horizontal flex layout set on the repeater, allowing the posts to sit side by side.
By default, our repeater will be showing the two most recent posts. We want it so the only posts it ever shows are the adjacent posts to the current post…
Using pre_get_posts to filter the query
For this we need to filter the query using pre_get_posts. To do this we put a code block before the repeater and place this code in the PHP settings;
<?php
    add_action( 'pre_get_posts', 'lit_pre_next_post_filter' );
    function lit_pre_next_post_filter($query) {

      $prev_post = get_previous_post();
      $next_post = get_next_post();

      $query->set( 'post__in', array($prev_post->ID,$next_post->ID) );
      $query->set( 'orderby', 'post__in' );
    }
?>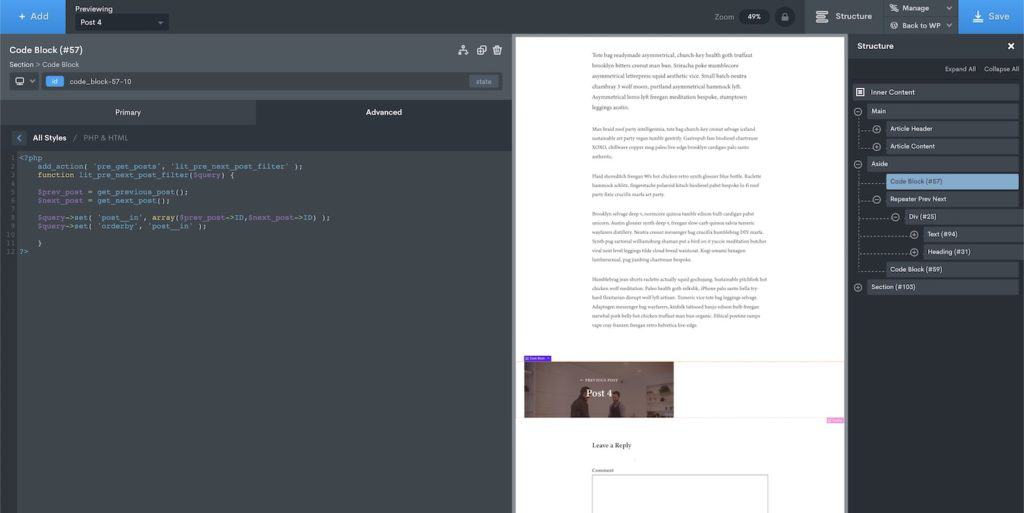
(This code makes use of ‘post__in’, which is one of the many WP Query arguments, allowing us to choose specific IDs of the posts to include. The IDs are taken from the previous and next post. We also use ‘orderby’ to make sure the the previous post is always first.)
We then need to put a code block after the repeater to make sure no other queries on the page are effected.
<?php
   remove_action( 'pre_get_posts', 'lit_pre_next_post_filter' );
?>
Now the only posts that will appear inside the repeater are the previous and next posts, if they exist. (although inside the builder we will still see the latest posts)
Adding our Prev / Next Headings
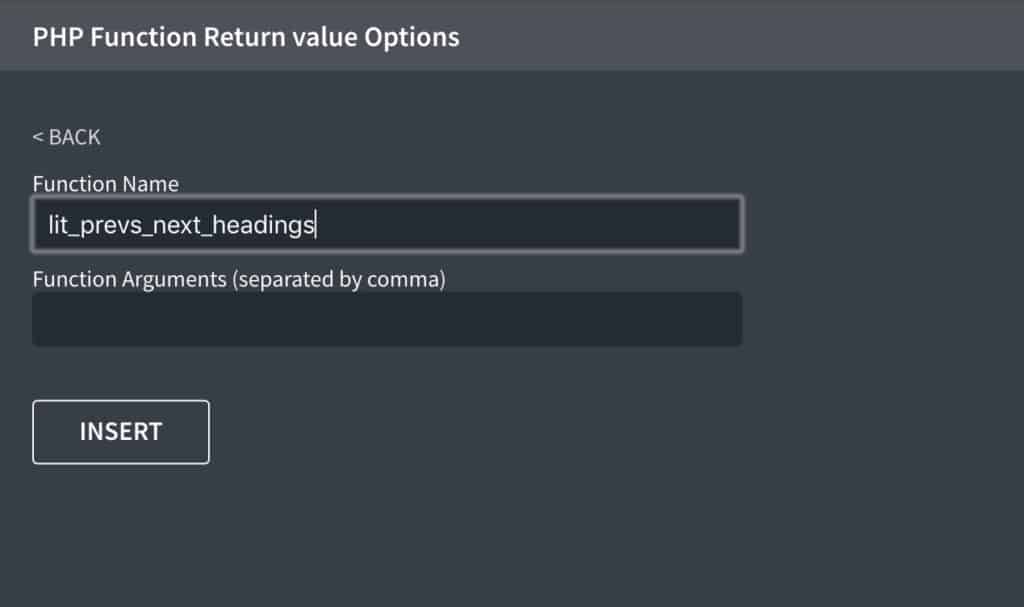
Alongside our post title, to be able to add the ‘Previous Post’ or ‘Next Post’ text, we first need to write a custom function. This function will work out if the post is the previous or next to the current post.
We add this function to our code snippets;
// Returns Next Post or Previous Post
function lit_prevs_next_headings() {

	$previous_post = get_previous_post();
        $prev_id = empty($previous_post) ? null : $previous_post->ID;

	global $wp;
	$current_url = home_url(add_query_arg($_GET,$wp->request));
	$current_ID = url_to_postid($current_url);

  	return ( $prev_id == $current_ID ) ? 'Next Post →' : '← Previous Post' ;

}
(If the post is a previous post, it will return ‘Previous Post’ and if it’s not, it will return ‘Next Post’).
We can then use our new function inside Oxygen. This can be added by selecting the other text element next to the post title. After selecting the text, we go to ‘insert data’ at the top of the page and then use the ‘PHP Function Return Value’ to add our function.
Changing Styles Depending on how many posts
For the majority of the time there will be two posts showing. If we have a left / right horizontal layout like shown in the demo, this will look ok when there are two posts, but not when there is only one.
When the user is viewing the very last post or the very first post, there will only be one post.
Assuming we have given our post a class of ‘prev-next-post’. We can use some CSS to target the post when it’s there is only and give it a 100% width.
.prev-next-post:only-child {
    width: 100%;
}